# Batch Actions
# Batch Upload Previews (as Thumbnails)
You can use the Add Thumbnails button  on the global page to massively import thumbnails.
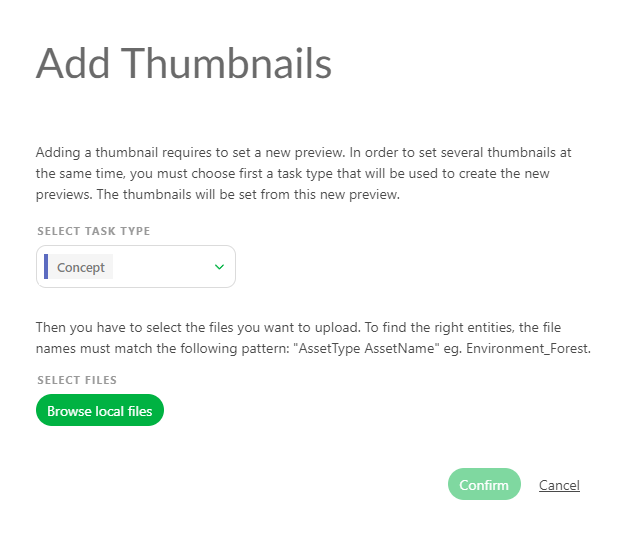
A new pop-up opens and asks you to choose which task types the thumbnails are linked.
Thumbnails batch import accept images files and video files.
For the video files, only the first frame is used as the thumbnail.
You have to name your thumbnails as sequence_shot.
# Create Assets from a CSV Spreadsheet File
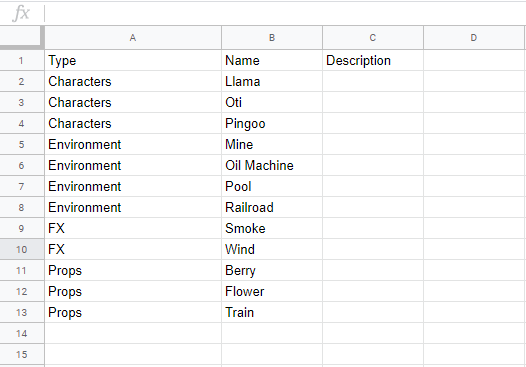
You may already have your asset list ready in a spreadsheet file.
With Kitsu, you have two ways to import them; the first is to import a .csv file, the second is to copy-paste your data directly into Kitsu.
First, save your spreadsheet as a .csv file.
Then, go back to the asset page on Kitsu, and click on the Import icon.

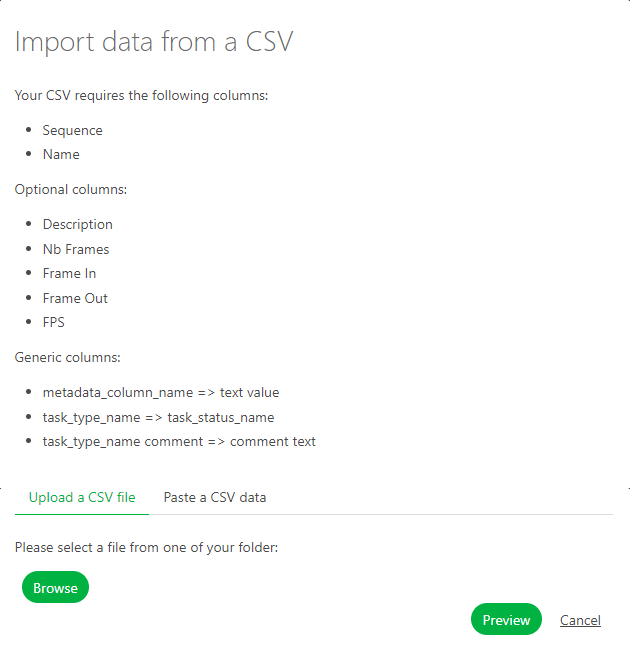
A pop-up window Import data from a CSV opens, click on Browse to pick your .csv file.
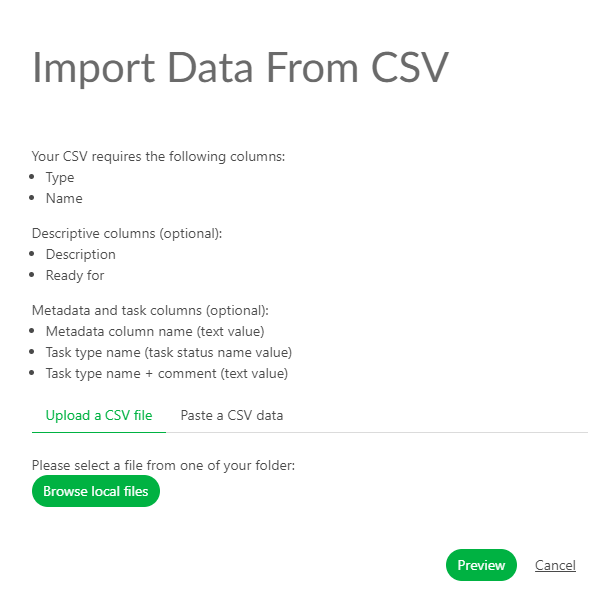
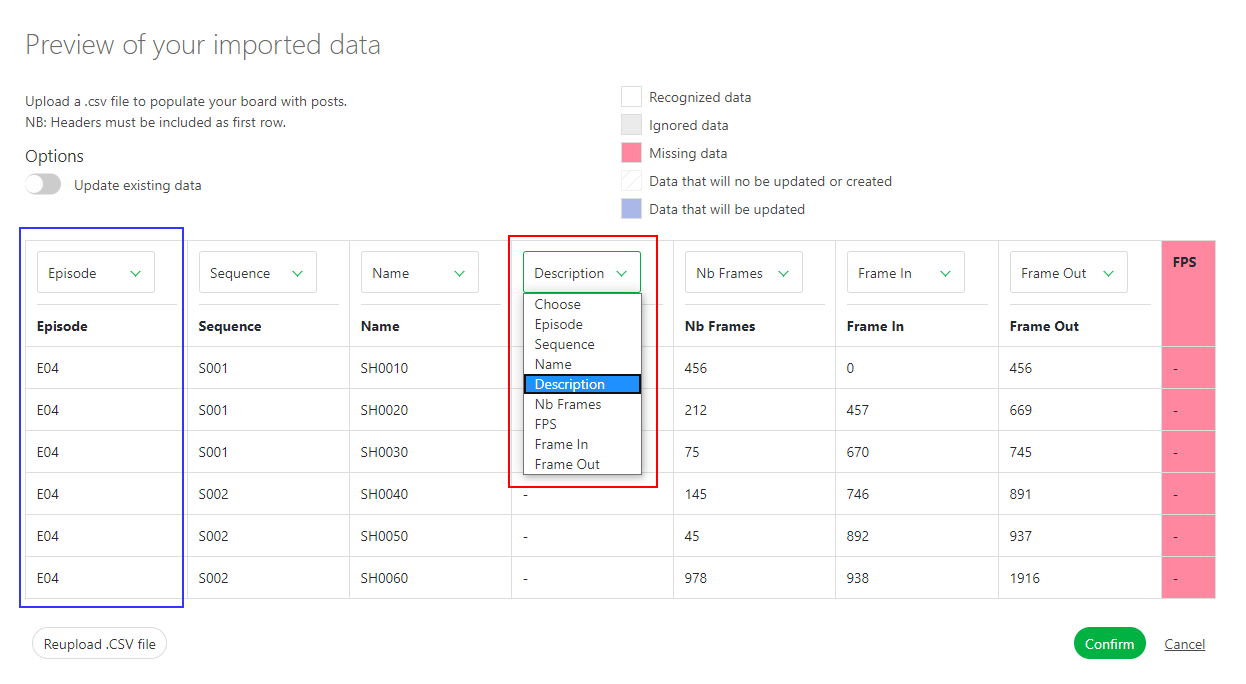
To see the result, click on the Preview button.
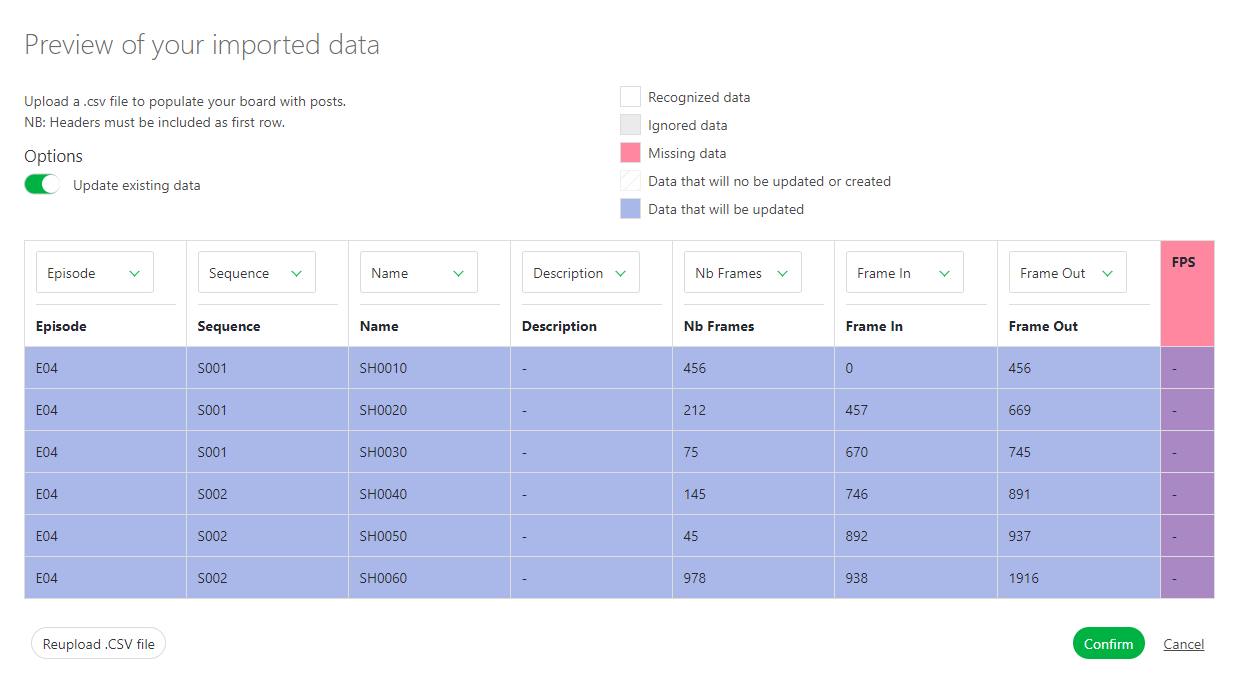
You can check and adjust the name of the columns with the preview of your data.
NB: the Episode column is only mandatory for a TV Show production.
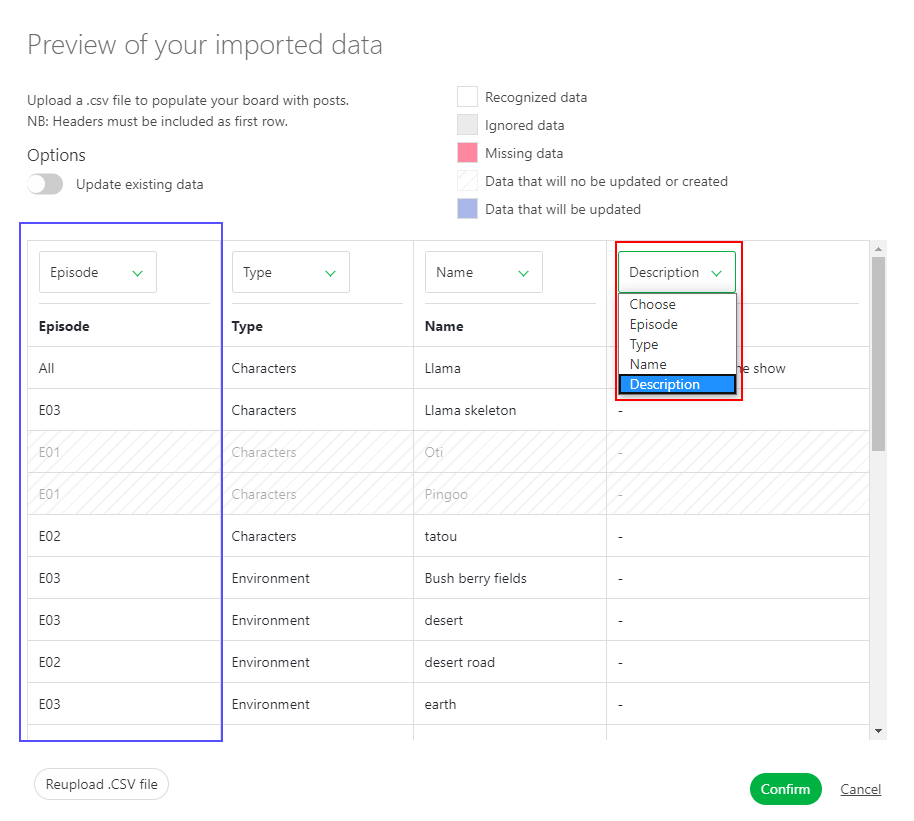
Once everything is good, click on the Confirm button to import your data into Kitsu.
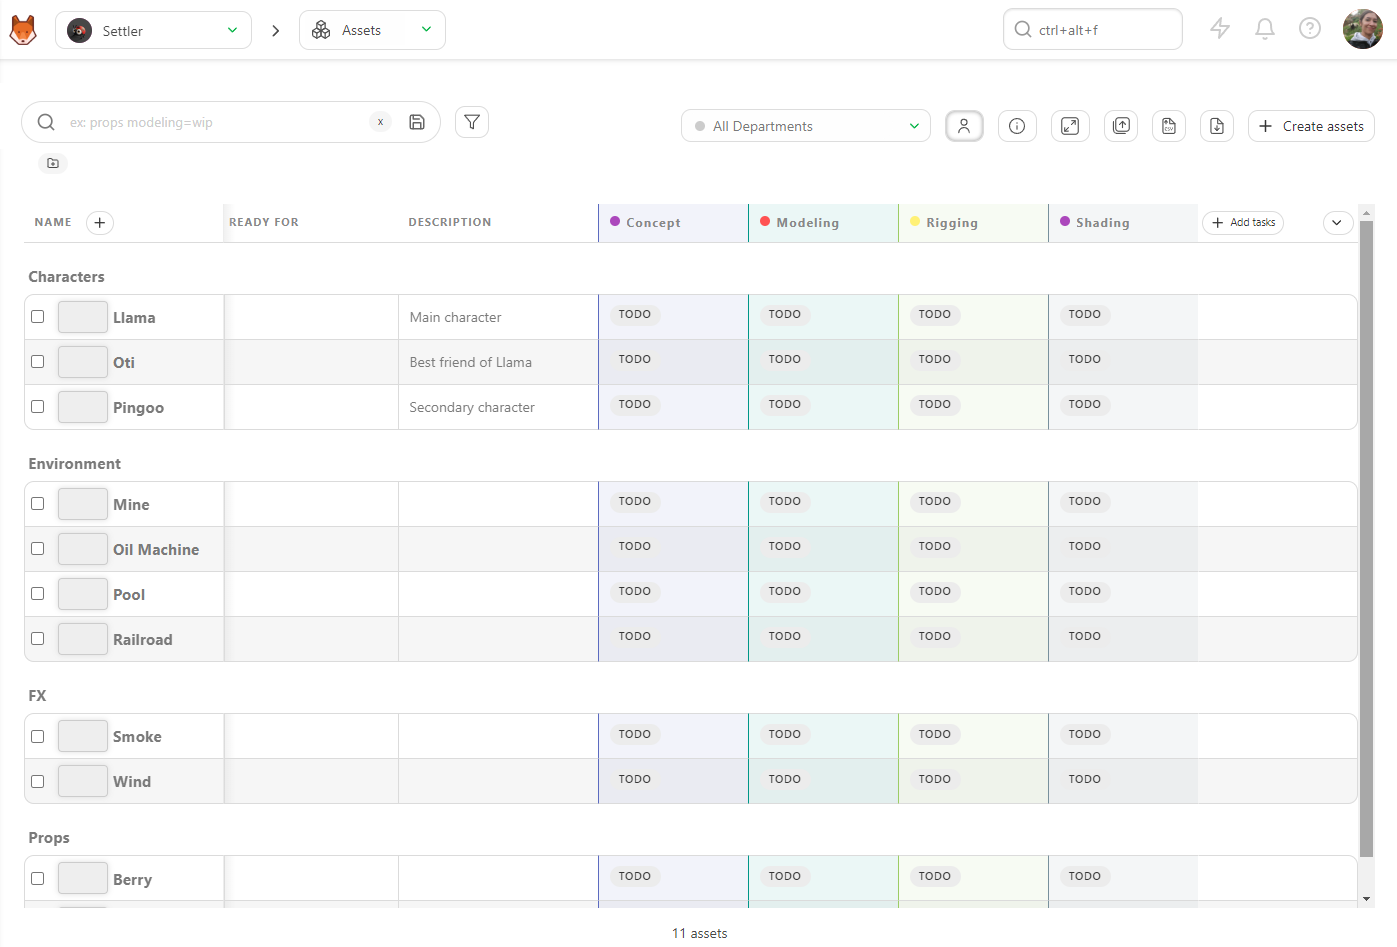
Now, you have all your assets imported into Kitsu and the task created according to your Settings.
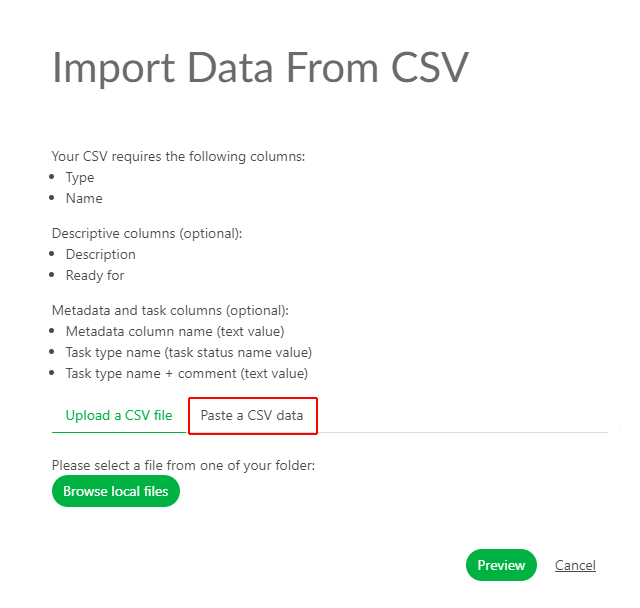
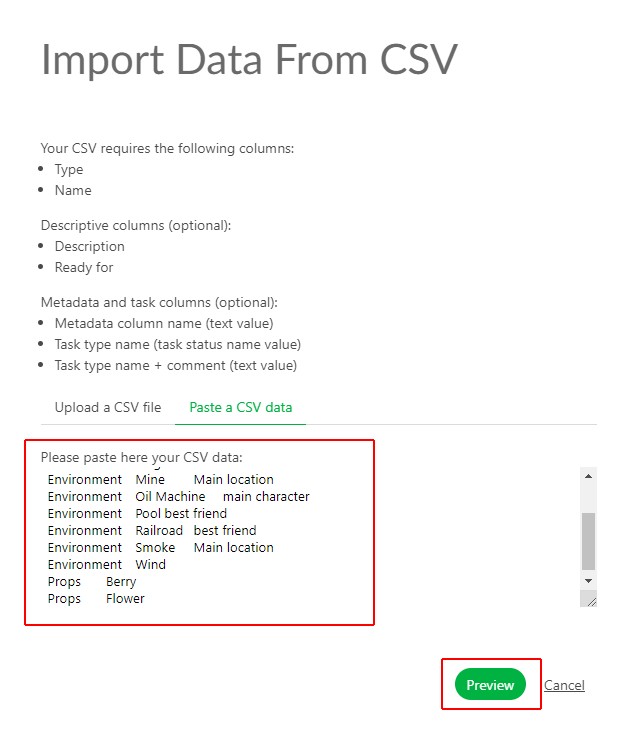
# Create Assets by Copy / Pasting a Spreadsheet File
Open your spreadsheet, select your data and copy them.
Then, go back to the asset page on Kitsu, and click on the Import icon
.
A pop-up window Import data from a CSV opens, click on the Paste a CSV data tab.
You can paste your previously selected data and see the result with the Preview button.
You can check and adjust the name of the columns with the preview of your data.
NB: the Episode column is only mandatory for a TV Show production.
Once everything is good, click on the Confirm button to import your data into Kitsu.
Now, you have all your assets imported into Kitsu and the task created according to your Settings.
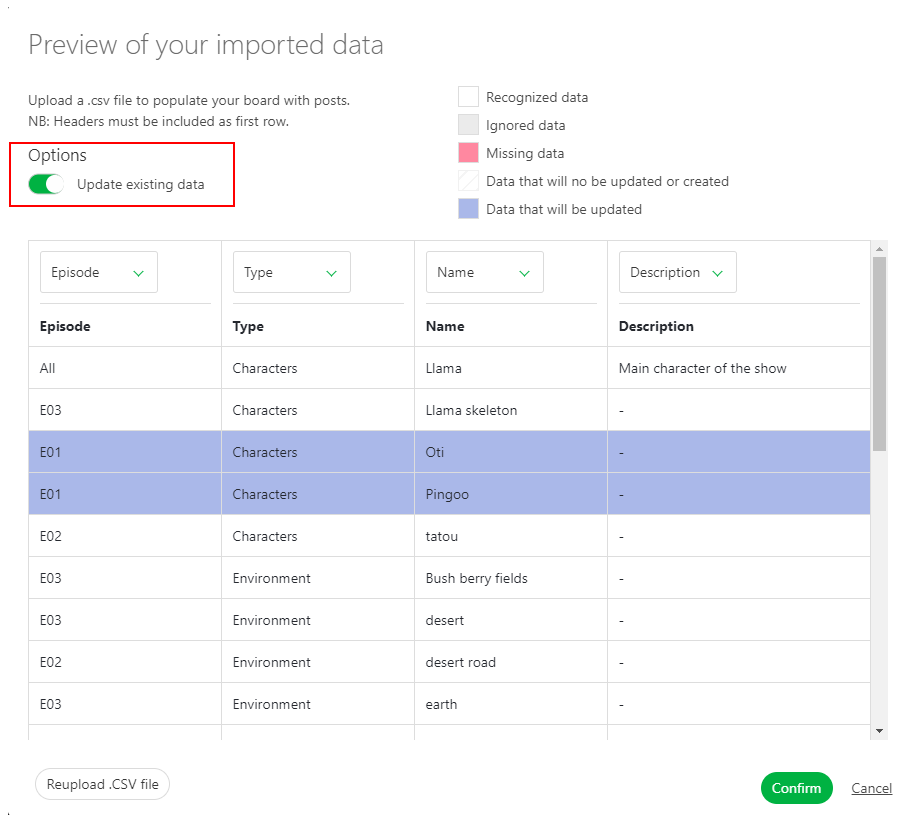
# Update Assets with the CSV Import
You can use the CSV import to update your data quickly.
You can update the type of an asset, the Assignation, the Status of tasks and add a Comment.
You need to switch on the option Update existing data. Then the lines that will be updated will be highlighted in blue.
# Update Assets by Copy / Pasting a Spreadsheet File
Open your spreadsheet, select your data and copy them.
Then, go back to the asset page on Kitsu, and click on the Import icon
.
A pop-up window Import data from a CSV opens, click on the Paste a CSV data tab.
You can paste your previously selected data and see the result with the Preview button.
You can check and adjust the name of the columns with the preview of your data.
NB: the Episode column is only mandatory for a TV Show production.
You need to switch on the option Update existing data. Then the lines that will be updated will be highlighted in blue.
Now, you have all your assets imported into Kitsu and the task created according to your Settings.
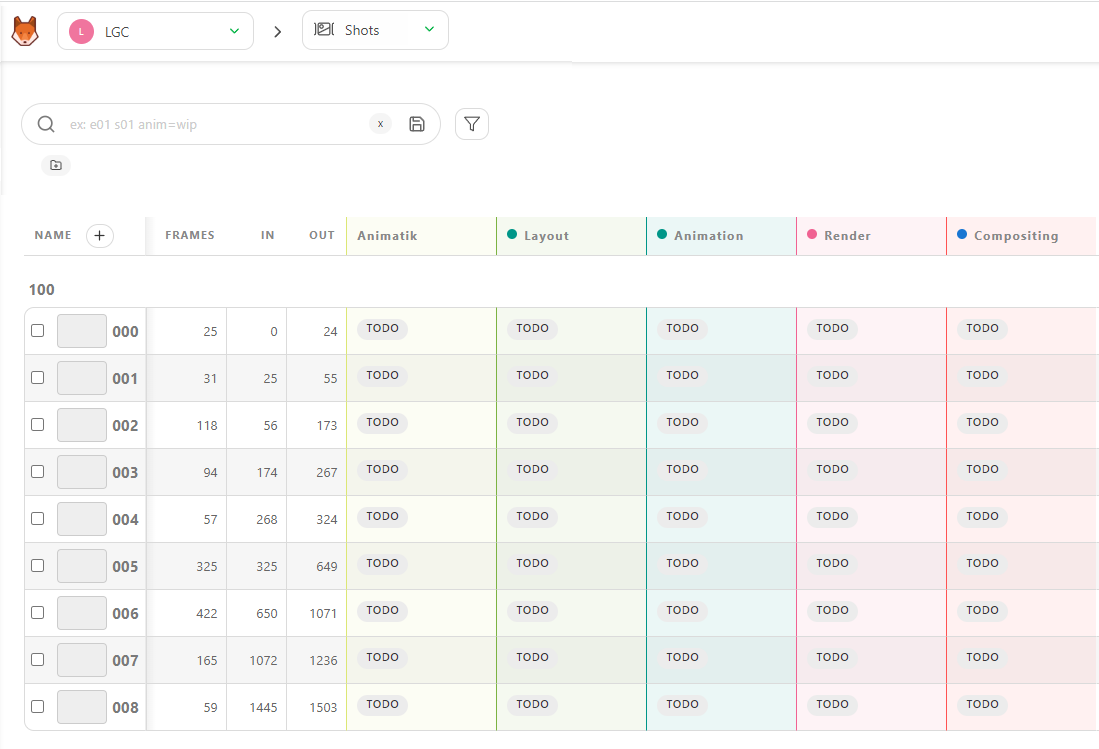
# Create Shots form an EDL File
You may already have your shots list ready in an EDL file. With Kitsu, you can import directly your EDL file to create the sequence, shot, number of frame, frame in and frame out.
On the Global Shot Page you have an Import EDL button.

On the pop-up you can select the naming convention of the video file used during the editing.
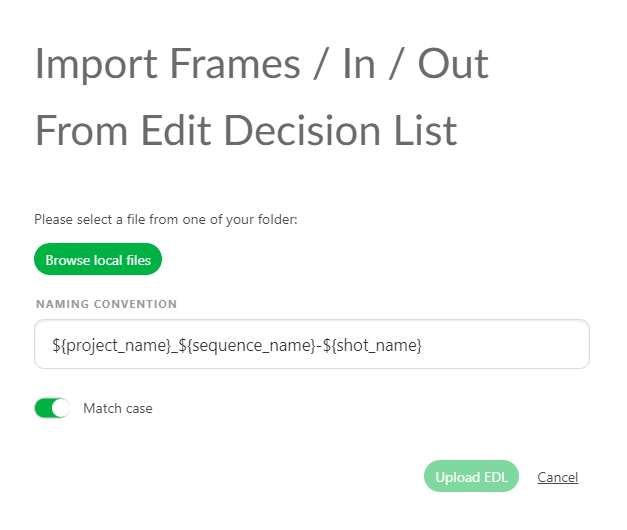
It means the video clip on the editing is named as project_sequence_shot.extension.
Here is an example of an EDL for the LGC production.

The video files are named LGC_100-000.mov, it means LGC is the production name, 100 is the sequence name, and 000 is the shot name.
Once you are set with the naming convention, you can import the edl file.
Then click on Upload EDL
Then Kitsu will create the shots.
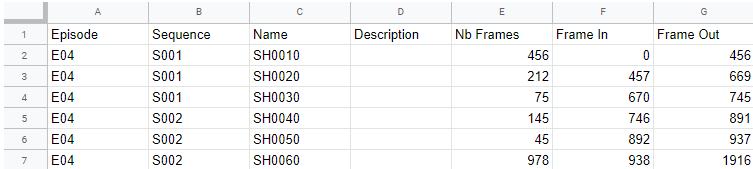
# Create Shots from a CSV Spreadsheet File
You may already have your shots list ready in a spreadsheet file.
With Kitsu, you have two ways to import them; the first is to import a .csv file directly, the second is to copy-paste your data directly into Kitsu.
First, save your spreadsheet as a .csv file.
Then, go back to the shot page on Kitsu, and click on the Import icon.
A pop-up window Import data from a CSV opens, click on Browse to pick your .csv file.
To see the result, click on the Preview button.
You can check and adjust the name of the columns with the preview of your data.
NB: the Episode column is only mandatory for a TV Show production.
Once everything is good, click on the Confirm button to import your data into Kitsu.
Now, you have all your shots imported into Kitsu, and the task created according to your Settings.

# Create Shots by Copy / Pasting a Spreadsheet File
Open your spreadsheet, select your data and copy them.
Then, go back to the shot page on Kitsu, and click on the Import icon
.
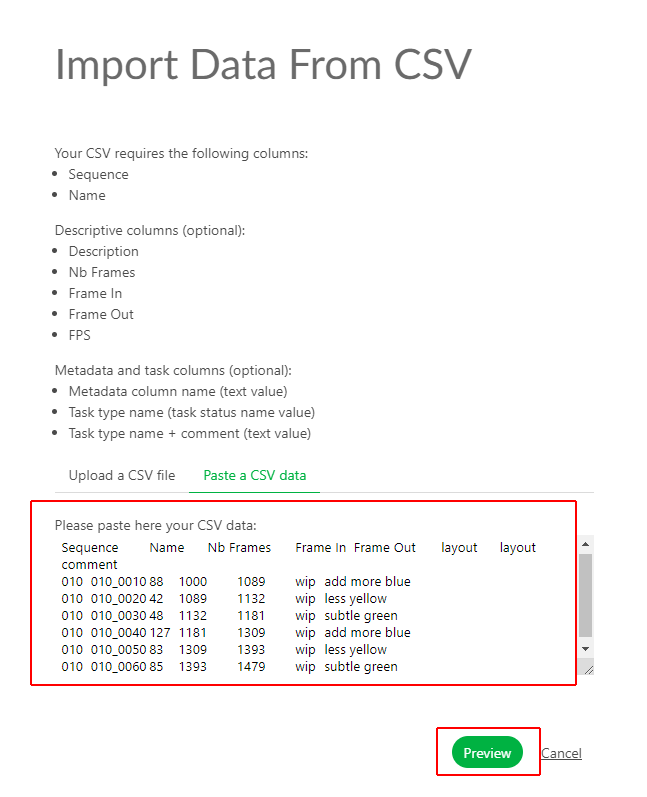
A pop-up window Import data from a CSV opens, click on the Paste a CSV data tab.
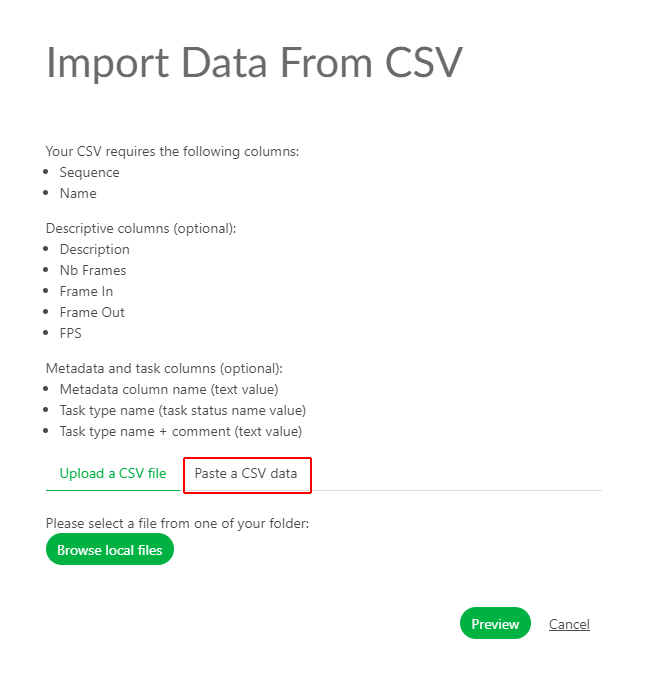
You can paste your previously selected data and see the result with the Preview button.
You can check and adjust the name of the columns with the preview of your data.
NB: the Episode column is only mandatory for a TV Show production.
Once everything is good, click on the Confirm button to import your data into Kitsu.
Now, you have all your shots imported into Kitsu, and the task created according to your Settings.
# Update Shots Information with CSV Import
You can use the CSV Import to update your data as the NB Frames, Frame IN, Frame Out or any custom Metadata column.
You can update the Assignation, the Status of tasks and add a Comment.
Open your spreadsheet, select your data and copy them.
Then, go back to the shot page on Kitsu, and click on the Import icon
.
A pop-up window Import data from a CSV opens, click on the Paste a CSV data tab.
You can paste your previously selected data and see the result with the Preview button.
You need to switch on the Option: Update existing data. the updated shots will be in blue
NB: the Episode column is only mandatory for a TV Show production.
Once everything is good, click on the Confirm button to import your data into Kitsu.
Now, you have all your shots imported into Kitsu, and the task created according to your Settings.
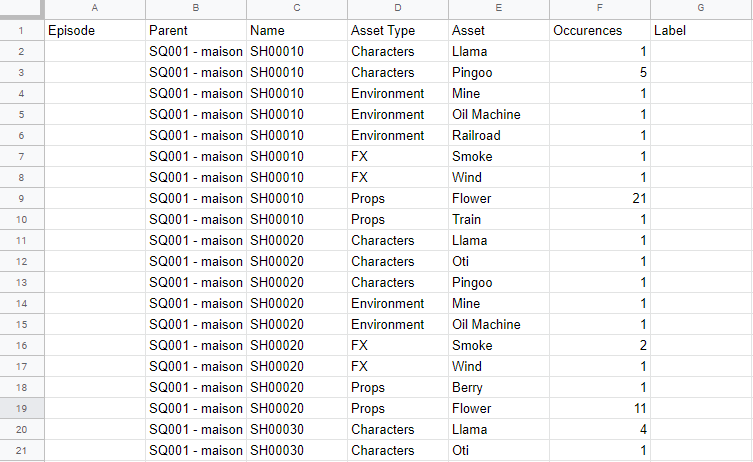
# Create a Breakdown List from a CSV File
You may already have your breakdown list ready in a spreadsheet file. With Kitsu, you have two ways to import it; the first is to import a .csv file directly, the second is to copy-paste your data directly into Kitsu.
First, save your spreadsheet as a .csv file following Kitsu's recommendation.
Click on the import button
A pop-up window Import data from a CSV opens, click on Browse to pick your .csv file.
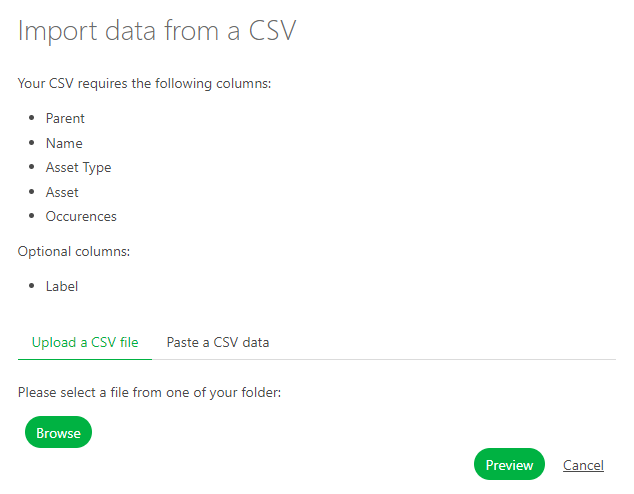
To see the result, click on the Preview button.
You can check and adjust the name of the columns with the preview of your data.
NB: the Episode column is only mandatory for a TV Show production.
Once everything is good, click on the Confirm button to import your data into Kitsu.
Now, you have your breakdown imported into Kitsu.
# Create a Breakdown List by Copy / Pasting a Spreadsheet File
Open your spreadsheet, select your data and copy them.
Then, go back to the breakdown page on Kitsu, and click on the Import icon
.
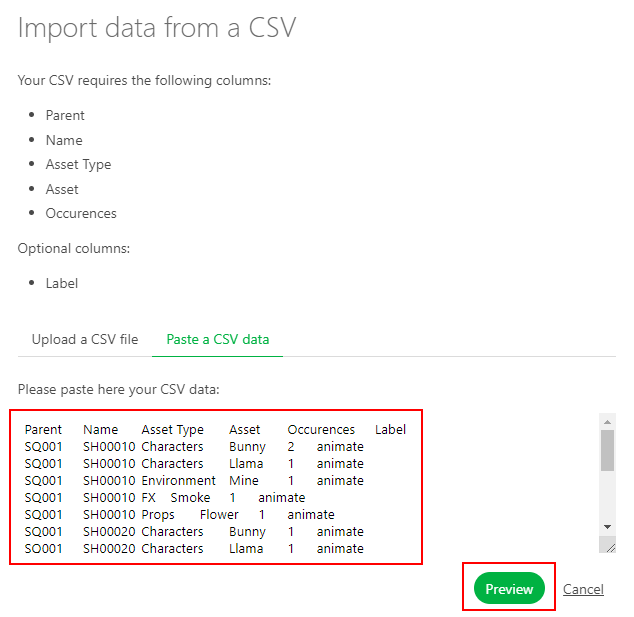
A pop-up window Import data from a CSV opens, click on the Paste a CSV data tab.
You can paste your previously selected data and see the result with the Preview button.
You can check and adjust the name of the columns with the preview of your data.
NB: the Episode column is only mandatory for a TV Show production.
Once everything is good, click on the Confirm button to import your data into Kitsu.
Now, you have all your assets imported into Kitsu.
# Add Employees from a CSV Spreadsheet File
You may already have your employee list ready in a spreadsheet file.
With Kitsu, you have two ways to import them; the first is to import a .csv file directly, the second is to copy-paste your data directly into Kitsu.
First, save your spreadsheet as a .csv file.
Then, go back to the people page on Kitsu, and click on the Import icon.
A pop-up window Import data from a CSV opens, click on Browse to pick your .csv file.

To see the result, click on the Preview button.
You can check and adjust the name of the columns with the preview of your data.
NB: the Role column is not mandatory.
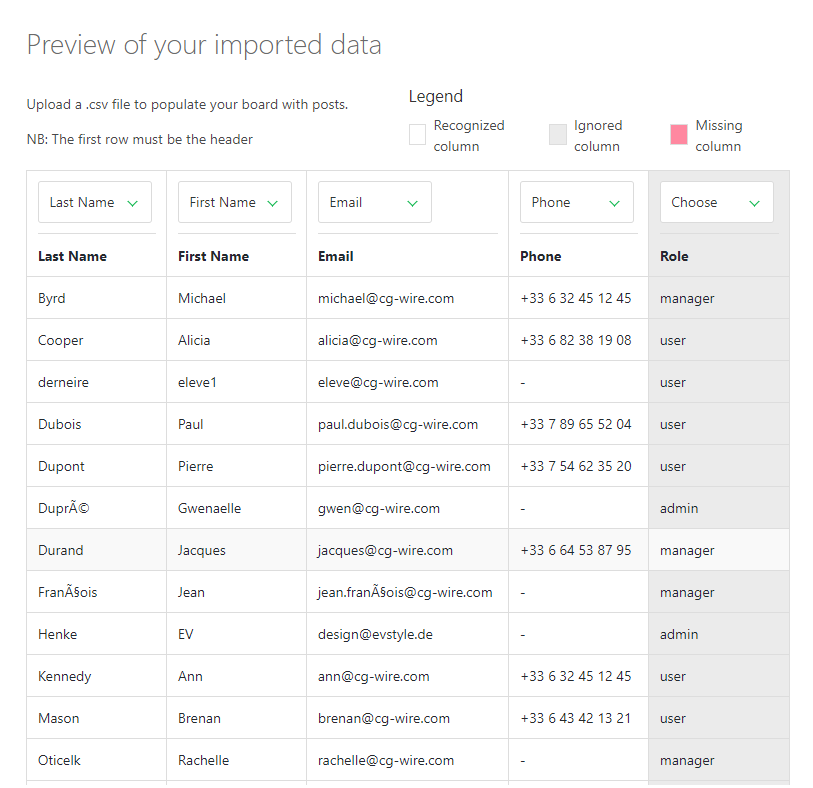
Once everything is good, click on the Confirm button to import your data into Kitsu.
Now, you have all your people imported into Kitsu.
